Introduction
Snowman is a static site generator for SPARQL backends.
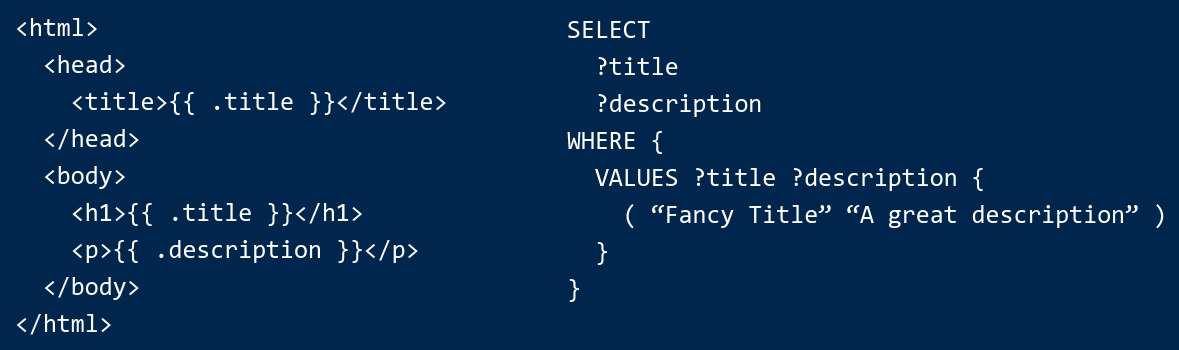
Snowman's templating system comes with RDF- and SPARQL-tailored features and takes its data from SPARQL queries. Snowman has first-class support for RDF concepts like: Language-tagged literals, IRIs, and XSD datatypes.
Jump right in
Background
Ever seen a project that models its data in RDF, but then uses a non-RDF technology to render it?
Snowman is designed to address this by allow RDF-based projects to use SPARQL in the user-facing parts of their stack, without sacrificing preformance. Today, Snowman is used to render everything from simple SKOS vocabularies to entire knowledge bases.
Snowman is not a high-level web-framework, actually, turns out people use it for a lot of things like data transformation and APIs! As a result, Snowman is rather unopinionated about how you structure your project, transforming data directly in SPARQL queries? or with the template engine? or both? It's up to you, that said, we have a style guide and some best practices to help you get started.
Installation
Snowman ships as a single binary, and is available for the most commons architectures and operating systems. Check out the releases page for the latest version. Once downloaded, you should rename it to snowman and install it by moving it to a directory in your PATH.
Using multiple versions
If you need to use multiple versions of Snowman, you can either rename the binary to something like snowman-0.5.0 and then symlink it to snowman in your PATH or use it directly by specifying the path to the binary(./path/to/snowman).
To ensure team members are using compatible versions, you can specify a version requirement in your snowman.yaml:
snowman_version: ">=0.7.0"
See the snowman.yaml reference for more details on version constraints.
Installing from source
If you would want to compile from source, you can do so:
git clone https://github.com/glaciers-in-archives/snowman
cd snowman
go build -o snowman
For all possible target operating systems and architectures, see the the following table.
Quick start
snowman new  --directory="best-project-name-ever"
cd best-project-name-ever
snowman build && snowman server
This will create a new Snowman project in the directory best-project-name-ever, build it, and start a local server. You can now visit http://localhost:8080 to see the built site. To get you started it fetches a few triples from Wikidata, gives you a basic layout, and a static file.
The project structure
The project structure upon using the snowman new command is as follows:
best-project-name-ever
├── queries # your SPARQL queries go here, create subdirectories to organize them
│   └── index.rq
├── static # static files go here, they are copied to the root of the build directory, make subdirectories to modify the output path
│   └── style.css
├── templates # your templates go here, create subdirectories to organize them, go beyond HTML!
    ├── includes # common name for components and partial templates
    │   └── footer.html
    ├── layouts # layouts are special templates that wrap other templates
    │   └── default.html
    ├── static.html # a page not feed by SPARQL but with full access to the template engine
    └── index.html # a page feed by SPARQL
├── snowman.yaml # core configuration go here, like the SPARQL endpoint and site metadata
└── views.yaml # all your views go here, a view connects a template to a SPARQL query, look for the index.html and static.html in this file
CLI
Snowman's command line interface (CLI) is the primary way to interact with a Snowman project. The CLI provides a set of commands to manage and build a Snowman project. The CLI is intended for development and continuous integration/delivery purposes.
build
The build command is used to build a Snowman project. It reads the configuration(snowman.yaml) file and the views file(views.yaml), then it fetches the data from a SPARQL endpoint, and finally it renders the templates. The output is written to the site directory.
snowman build
Flags
--cache(-c) Sets the cache strategy. "available" will use cached SPARQL responses when available and fallback to making queries. "never" will ignore existing cache and will not update or set new cache. (default "available")--config(-f) The path to the configuration file. (default "snowman.yaml")--snowman-directory(-d) The path to your Snowman directory. (default ".snowman")--help(-h) Shows help for the command.--verbose(-v) Enables verbose output.--static(-s) Only update static files, do not fetch data or render templates.--timeit(-t) Print the time it took to build the site.
cache
The cache command is a powerful tool used to manage the two different cache stores held by Snowman. One for HTTP requests made by the SPARQL engine and one for non-SPARQL HTTP requests. Snowman will by default cache HTTP responses to avoid making the same request multiple times even across multiple builds.
The cache command has two subcommands: sparql and resources.
sparql
The sparql command is used to inspect and clear the SPARQL cache.
sparql inspect
The inspect subcommand is used to inspect the SPARQL cache. It allows you to view the contents of the cache.
Its first argument is the file name or path of the query you want to inspect.
snowman cache sparql inspect my-query.rq
If your query is parameterized, you can pass the parameter values as additional arguments. Passing a parameterized query without parameters will yeild the number of items for that query.
snowman cache sparql inspect my-parameterized-query.rq my-param-value
You can select only unused queries by using the --unused flag. When used, the command does not expect any arguments.
snowman cache sparql inspect --unused
sparql clear
The clear subcommand is used to clear the SPARQL cache. It allows you to clear the cache for a specific query, all queries, only unused queries, or a specific parameterized query.
It follows the same syntax as the inspect subcommand.
Clear the cache for a query.
snowman cache sparql clear my-query.rq
Clear a specific parameterized query.
snowman cache sparql clear my-parameterized-query.rq my-param-value
Clear the cache for all queries.
snowman cache sparql clear
Clear the cache for only unused queries.
snowman cache sparql clear --unused
Flags
--unused(-u) Selects only unused queries. Used without arguments.--snowman-directory(-d) The path to your Snowman directory. (default ".snowman")--help(-h) Shows help for the command.--verbose(-v) Enables verbose output.--timeit(-t) Print the time it took to build the site.
resources
The resources subcommand of the cache command is used to manage the cache store for non-SPARQL HTTP requests.
resources inspect
The inspect subcommand is used to inspect the resources cache. It allows you to view the contents of the cache by passing the URL of the resource you want to inspect.
snowman cache resources inspect https://example.com/resource
You can also list the number of items in the cache by not passing any arguments.
snowman cache resources inspect
In addition, you can select only unused resources by using the --unused flag. When used, the command does not expect any arguments.
snowman cache resources inspect --unused
resources clear
The clear subcommand is used to clear the resources cache. It allows you to clear the cache for a specific resource, all resources, or only unused resources.
It follows the same syntax as the inspect subcommand.
Clear the cache for a resource.
snowman cache resources clear https://example.com/resource
Clear the cache for all resources.
snowman cache resources clear
Clear the cache for only unused resources.
snowman cache resources clear --unused
Flags
--unused(-u) Selects only unused queries. Used without arguments.--snowman-directory(-d) The path to your Snowman directory. (default ".snowman")--help(-h) Shows help for the command.--verbose(-v) Enables verbose output.--timeit(-t) Print the time it took to build the site.
completion
The completion command generates shell completion scripts for the Snowman CLI.
snowman completion <shell>
Arguments
bashGenerates a bash completion script.zshGenerates a zsh completion script.fishGenerates a fish completion script.powershellGenerates a powershell completion script.
Flags
--help(-h) Shows help for the command if used in combination with an argument it will show installation instructions for the completion script.
new
The new command is used to scaffold a new Snowman project by setting up a basic project structure and configuration files.
snowman new --directory="best-project-name-ever"
See the quick start for more information about the generated project structure.
Flags
--directory(-d) The name of the directory to create the project in. (default "my-new-project")--help(-h) Shows help for the command.
server
The server command is used to start a local server to serve the built site. It's only intended for development purposes.
snowman server
Flags
--address(-a) The address to listen on. (default "127.0.0.1")--help(-h) Shows help for the command.--port(-p) The port to listen on. (default "8000")
version
The version command prints the version of Snowman.
snowman version
Format
The output is a single line consisting of three parts separated by spaces:
Snowman 0.5.0-development linux/amd64
- The name of the application, allways
Snowman. - The version of the application(semver).
- The operating system and architecture the binary was built for.
Flags
--help(-h) Shows help for the command.
Template syntax
Snowman uses Go templates to render the output of a Snowman project. While Go provides their own documentation on how to use its templatings systen we do the same here but with a focus on how to use it with Snowman.
Variables
Variables can be defined inside of templates by using a keyword prefixed with $:
{{ $my_variable := "this is a string" }}
To change the value of a existing variable:
{{ $my_variable = "this is a new string" }}
Variables initiated by a control-structure(such as a range statement) is accessed by the special variable .:
{{ range $my_list }}
    Current list item: {{ . }}
{{ end }}
Fields can be assesed by suffixing your variable name with . followed by the field name:
{{ $my_other_variable.A_field }}
A variable’s scope extends to the end action of the control structure in which it is declared, or to the end of the template if there is no such control structure.
Comments
Comments are not rendered in the output. They are useful for adding notes to the source code that are not meant to be displayed in the output.
{{/* my very important comment */}}
Comments can span multiple lines.
{{/*
  This is a comment
  that spans multiple lines
*/}}
Comments can also contain trim markers to remove surrounding whitespace. To learn more about trim makers see the chapter on whitespace control.
{{- /* this is a comment with trim markers */ -}}
Whitespace control
Snowman templates renders everything between code blocks and comments including whitespace and line feeds. As a result the output can look messy. To control the extra white whitespace in the output you can use trim markers.
Considering the following example.
<ul>
{{ range .foos }}
    <li>list item</li>
{{ end }}
</ul>
The {{ range .foos }} and {{ end }} blocks are sourrounded line breaks which will be rendered in the output. To remove the extra whitespace you can use trim markers.
<ul>
{{- range .foos -}}
    <li>list item</li>
{{- end -}}
</ul>
The - is optional and can be placed on either side of the block. The following example will render in the same way as the previous example.
<ul>{{ range .foos -}}
    <li>list item</li>
{{- end }}</ul>
You can also use trim markers with comments:
{{- /* this is a comment with trim markers */ -}}
Loops
This page is a stub. You can help by expanding it.
Conditionals
This page is a stub. You can help by expanding it.
Indexing
This page is a stub. You can help by expanding it.
Includes
This page is a stub. You can help by expanding it.
Layouts
This page is a stub. You can help by expanding it.
Pipes
This page is a stub. You can help by expanding it.
Template functions
While Snowman is built on top of Go's templating system it do provide its own set of template function to make it easier to work with RDF data and RDF defined data types.
Math
add
The add function preforms addition on two numbers.
{{ add 5 6 }}
sub
The sub function subtracts two given integer values.
{{ sub 10 5 }}
mul
The mul function multiplies two given integer values.
{{ mul 5 6 }}
div
The div function divides two given integer values.
{{ div 10 2 }}
mod
The mod function returns the modulus of two given values.
{{ mod 5 2 }}
add1
The add1 function increments the given integer by 1.
{{ add1 3 }}
rand
Given two values, the rand function returns a random integer between them.
{{ rand 5 10 }}
Boolean
and
The and function returns true if all of the given boolean values are true, otherwise it returns false.
{{ and $variable1 $variable2 }}
or
The or function returns true if any of the given boolean values are true.
{{ or $variable1 $variable2 }}
not
The not function returns the negation of the given boolean value.
{{ not $variable }}
eg
The eg function returns the boolean truth of arg1 == arg2.
{{ eg $variable1 $variable2 }}
ne
The ne function returns the boolean truth of arg1 != arg2.
{{ ne $variable1 $variable2 }}
lt
The lt function returns the boolean truth of arg1 < arg2.
{{ lt $variable1 $variable2 }}
le
The le function returns the boolean truth of arg1 <= arg2.
{{ le $variable1 $variable2 }}
gt
The gt function returns the boolean truth of arg1 > arg2.
{{ gt $variable1 $variable2 }}
ge
The ge function returns the boolean truth of arg1 >= arg2.
{{ ge $variable1 $variable2 }}
Strings
print
The print function formats using the default formats for its arguments and returns the resulting string. Spaces are added between arguments when neither is a string.
{{ print $variable1 $variable2 }}
printf
The printf function formats according to a format specifier and returns the resulting string.
{{ printf "%s %s" "hello" "world" }}
println
The println function formats using the default formats for its arguments.Spaces are always added between operands and a newline is appended.
{{ println $variable1 $variable2 }}
join
The ´join´ function which takes a separator and any number of strings and concatenates them, separating each with the separator string.
{{ join ", " "apple" "orange" "banana" }}
split
The split function splits a string into a list of substrings separated by a delimiter.
{{ split "hello world" " " }}
replace
replace function replaces substrings in a string with a given string.
The first argument is the string to which the replacement is to be applied, the second argument is the substring to be replaced, the third argument is the substring to replace with and finally the fourth argument is the number of replacements to be made. If the fourth argument is is set to -1 then all occurrences will be replaced.
{{ replace "hello world" "world" "earth" -1 }}
replace_re
The replace_re function replaces substrings in a string with another string using a regular expression.
{{ re_replace "Hello world" "world$" "Snowman" }}
ucase
The ucase function converts a string to uppercase.
{{ ucase "hello world" }}
lcase
The lcase function converts a string to lowercase.
{{ lcase "HELLO WORLD" }}
tcase
The tcase function formats a string accoring to title case rules.
{{ tcase "hello world" }}
has_prefix
The has_prefix function tests whether the given string begins with the given prefix.
{{ has_prefix "hello world" "hello" }}
has_suffix
The has_suffix function tests whether the given string ends with the given suffix.
{{ has_suffix "hello world" "world" }}
trim
The trim function removes leading and trailing whitespace from a string.
{{ trim " hello world " }}
contains
The contains function returns true if the string contains the substring, otherwise false.
{{ contains "hello world" "hello" }}
Typing
type
The type function returns the type of the value passed to it.
{{ type 42 }}
uri
The uri function takes a string and casts it to a URI.
{{ uri "https://schema.org/Person" }}
JSON
to_json
The to_json function takes a value and converts it to an JSON string.
{{ to_json "Alice" }}
from_json
The from from_json function takes a string and parses it as JSON.
{{ from_json "{\"name\": \"Alice\"}" }}
Dictionaries
Snowman provides a set of functions for working with dictionaries (also known as maps or associative arrays). These functions allow you to create, manipulate, and query dictionary data structures in your templates.
Dictionaries are useful for organizing related data, building dynamic structures, and transforming data during template rendering.
Available Functions
dict_create- Create a new dictionary from key-value pairsdict_get- Get a value from a dictionary by keydict_set- Set a key-value pair in a dictionarydict_unset- Remove a key from a dictionarydict_has_key- Check if a dictionary contains a keydict_keys- Get all keys from one or more dictionariesdict_values- Get all values from a dictionarydict_pick- Create a new dictionary with only specified keysdict_omit- Create a new dictionary excluding specified keysdict_pluck- Extract values for a specific key from multiple dictionariesdict_find- Navigate nested dictionaries safely with a default value
dict_create
The dict_create function creates a new dictionary from key-value pairs.
Syntax
{{ dict_create "key1" "value1" "key2" "value2" ... }}
Example
{{ $person := dict_create "name" "Alice" "age" 30 "city" "Stockholm" }}
<p>Name: {{ dict_get $person "name" }}</p>
<p>Age: {{ dict_get $person "age" }}</p>
<p>City: {{ dict_get $person "city" }}</p>
Output:
<p>Name: Alice</p>
<p>Age: 30</p>
<p>City: Stockholm</p>
Notes
- Keys must be strings
- Values can be any type (strings, numbers, booleans, arrays, or nested dictionaries)
- If an odd number of arguments is provided, the last key will have an empty string value
dict_get
The dict_get function retrieves a value from a dictionary by its key.
Syntax
{{ dict_get dictionary "key" }}
Example
{{ $config := dict_create "theme" "dark" "language" "en" "timezone" "UTC" }}
Theme: {{ dict_get $config "theme" }}
Language: {{ dict_get $config "language" }}
Missing: {{ dict_get $config "nonexistent" }}
Output:
Theme: dark
Language: en
Missing:
Notes
- Returns an empty string if the key doesn't exist
- Use
dict_has_keyto check for key existence before retrieving - For nested dictionaries, use
dict_findinstead
dict_set
The dict_set function sets or updates a key-value pair in a dictionary and returns the modified dictionary.
Syntax
{{ $dict := dict_set dictionary "key" value }}
Example
{{ $settings := dict_create "volume" 50 "muted" false }}
{{ $settings = dict_set $settings "volume" 75 }}
{{ $settings = dict_set $settings "equalizer" "on" }}

Volume: {{ dict_get $settings "volume" }}
Muted: {{ dict_get $settings "muted" }}
Equalizer: {{ dict_get $settings "equalizer" }}
Output:
Volume: 75
Muted: false
Equalizer: on
Notes
- If the key already exists, its value is updated
- If the key doesn't exist, it's added to the dictionary
- Returns the modified dictionary (allows chaining)
- Modifies the original dictionary in place
dict_unset
The dict_unset function removes a key from a dictionary and returns the modified dictionary.
Syntax
{{ $dict := dict_unset dictionary "key" }}
Example
{{ $user := dict_create "username" "alice" "password" "secret123" "email" "[email protected]" }}
{{ $user = dict_unset $user "password" }}

{{ range dict_keys $user }}
  {{ . }}
{{ end }}
Output:
username
email
Notes
- If the key doesn't exist, the dictionary is unchanged
- Returns the modified dictionary
- Modifies the original dictionary in place
- Useful for removing sensitive data or temporary fields
dict_has_key
The dict_has_key function checks whether a dictionary contains a specific key.
Syntax
{{ dict_has_key dictionary "key" }}
Example
{{ $data := dict_create "title" "Hello World" "author" "Alice" }}

{{ if dict_has_key $data "title" }}
  <h1>{{ dict_get $data "title" }}</h1>
{{ end }}

{{ if dict_has_key $data "subtitle" }}
  <h2>{{ dict_get $data "subtitle" }}</h2>
{{ else }}
  <h2>No subtitle</h2>
{{ end }}
Output:
  <h1>Hello World</h1>

  <h2>No subtitle</h2>
Notes
- Returns
trueif the key exists,falseotherwise - Useful for conditional rendering based on data availability
- The key's value doesn't matter—even empty string or
falsevalues returntrueif the key exists
dict_keys
The dict_keys function returns a list of all keys from one or more dictionaries.
Syntax
{{ dict_keys dictionary1 dictionary2 ... }}
Example
Single dictionary
{{ $person := dict_create "name" "Bob" "age" 25 "city" "Oslo" }}
<ul>
{{ range dict_keys $person }}
  <li>{{ . }}</li>
{{ end }}
</ul>
Output:
<ul>

  <li>name</li>

  <li>age</li>

  <li>city</li>

</ul>
Multiple dictionaries
{{ $dict1 := dict_create "a" 1 "b" 2 }}
{{ $dict2 := dict_create "c" 3 "d" 4 }}
Keys: {{ join (dict_keys $dict1 $dict2) ", " }}
Output:
Keys: a, b, c, d
Notes
- Returns keys in no particular order (dictionaries are unordered)
- When multiple dictionaries are provided, all keys from all dictionaries are returned
- Duplicate keys from different dictionaries will appear multiple times
dict_values
The dict_values function returns a list of all values from a dictionary.
Syntax
{{ dict_values dictionary }}
Example
{{ $scores := dict_create "math" 95 "science" 87 "history" 92 }}
<ul>
{{ range dict_values $scores }}
  <li>Score: {{ . }}</li>
{{ end }}
</ul>
Output:
<ul>

  <li>Score: 95</li>

  <li>Score: 87</li>

  <li>Score: 92</li>

</ul>
Notes
- Returns values in no particular order (dictionaries are unordered)
- The returned list contains only the values, not the keys
- Useful for iterating over values when keys aren't needed
dict_pick
The dict_pick function creates a new dictionary containing only the specified keys from the original dictionary.
Syntax
{{ dict_pick dictionary "key1" "key2" ... }}
Example
{{ $user := dict_create "username" "alice" "password" "secret" "email" "[email protected]" "role" "admin" "lastLogin" "2025-12-25" }}
{{ $publicData := dict_pick $user "username" "email" "role" }}

Public user data:
{{ range $key, $value := $publicData }}
  {{ $key }}: {{ $value }}
{{ end }}
Output:
Public user data:

  username: alice

  email: [email protected]

  role: admin
Notes
- Creates a new dictionary; the original is unchanged
- If a specified key doesn't exist in the original dictionary, it's silently ignored
- Useful for filtering sensitive data or creating subsets of larger dictionaries
- The opposite of
dict_omit
dict_omit
The dict_omit function creates a new dictionary excluding the specified keys from the original dictionary.
Syntax
{{ dict_omit dictionary "key1" "key2" ... }}
Example
{{ $response := dict_create "id" 123 "name" "Product" "price" 29.99 "internal_code" "X-2025" "warehouse_id" 5 }}
{{ $apiResponse := dict_omit $response "internal_code" "warehouse_id" }}

API Response:
{{ range $key, $value := $apiResponse }}
  {{ $key }}: {{ $value }}
{{ end }}
Output:
API Response:

  id: 123

  name: Product

  price: 29.99
Notes
- Creates a new dictionary; the original is unchanged
- If a specified key doesn't exist in the original dictionary, it's silently ignored
- Useful for removing internal fields, sensitive data, or temporary values
- The opposite of
dict_pick
dict_pluck
The dict_pluck function extracts values for a specific key from multiple dictionaries, returning them as a list.
Syntax
{{ dict_pluck "key" dictionary1 dictionary2 ... }}
Example
{{ $person1 := dict_create "name" "Alice" "age" 30 "city" "Stockholm" }}
{{ $person2 := dict_create "name" "Bob" "age" 25 "city" "Oslo" }}
{{ $person3 := dict_create "name" "Charlie" "age" 35 "city" "Copenhagen" }}

Names: {{ join (dict_pluck "name" $person1 $person2 $person3) ", " }}
Ages: {{ join (dict_pluck "age" $person1 $person2 $person3) ", " }}
Output:
Names: Alice, Bob, Charlie
Ages: 30, 25, 35
Example with iteration
{{ $users := list }}
{{ $users = append $users (dict_create "id" 1 "username" "alice" "active" true) }}
{{ $users = append $users (dict_create "id" 2 "username" "bob" "active" false) }}
{{ $users = append $users (dict_create "id" 3 "username" "charlie" "active" true) }}

<ul>
{{ range dict_pluck "username" $users }}
  <li>{{ . }}</li>
{{ end }}
</ul>
Notes
- The first argument is the key to extract
- Remaining arguments are the dictionaries to extract from
- Only includes values from dictionaries that have the specified key
- If a dictionary doesn't have the key, it's skipped (not included in the result)
- Useful for extracting a column of data from a list of dictionaries
dict_find
The dict_find function safely navigates nested dictionaries, returning a default value if any key in the path doesn't exist.
Syntax
{{ dict_find "key1" "key2" ... "keyN" defaultValue dictionary }}
Example
Basic nested access
{{ $config := dict_create "database" (dict_create "host" "localhost" "port" 5432) }}

Host: {{ dict_find "database" "host" "unknown" $config }}
Port: {{ dict_find "database" "port" 0 $config }}
User: {{ dict_find "database" "user" "default_user" $config }}
Output:
Host: localhost
Port: 5432
User: default_user
Deeply nested structure
{{ $data := dict_create "user" (dict_create "profile" (dict_create "settings" (dict_create "theme" "dark"))) }}

Theme: {{ dict_find "user" "profile" "settings" "theme" "light" $data }}
Lang: {{ dict_find "user" "profile" "settings" "language" "en" $data }}
Output:
Theme: dark
Lang: en
Notes
- Arguments are: path keys, default value, then the dictionary
- The last two arguments are always the default value and the dictionary
- All preceding arguments are the path of keys to traverse
- Returns the default value if any key in the path doesn't exist
- Safer than chained
dict_getcalls as it won't error on missing keys - Particularly useful when working with data from external sources where structure isn't guaranteed
HTTP
query
The query function allows for the issuing of SPARQL queries or parameterized SPARQL queries from within templates. The function takes one or more parameters. The first is the name of the query, and the following parameters, optionally, is are strings to inject into the query. The given injection strings will replace instances of {{.}} in their given order.
{{ query "name_of_parameterized_query.rq" "param" }}
{{ query "name_of_query.rq" }}
query_construct
The query_construct function allows for the issuing of SPARQL CONSTRUCT queries or parameterized SPARQL CONSTRUCT queries from within templates. SPARQL CONSTRUCT queries return JSON-LD that can be processed further using other template functions.
The function takes one or more parameters. The first is the name of the query, and the following parameters, optionally, is are strings to inject into the query. The given injection strings will replace instances of {{.}} in their given order.
{{ $results1 := query_construct "name_of_query.rq" }}
{{ $results2 := query_construct "name_of_parameterized_query.rq" "param" }}
{{ $results := query_construct "skos_concepts.rq" .collection }}
{{ range $results }}
<article>
  <h1>URI: {{ index . "@id" }}</h1>
  <ul>
  {{ range (index . "http://www.w3.org/2004/02/skos/core#prefLabel") }}
    <li lang="{{ index . "@lang" }}">{{ index . "@value" }}</li>
  {{ end }}
  </ul>
</article>
{{ end }}
get_remote
The get_remote function fetches the content of a remote URL and returns it as a string.
{{ get_remote "https://example.com" }}
get_remote_with_config
The get_remote_with_config function fetches the content of a remote URL and returns it as a string. It takes a configuration object as an argument, which can be used to set custom HTTP headers.
{{ get_remote_with_config "https://example.com" $config }}
Templates
include
The ìnclude` function can be used to insert another HTML template at its position during rendering. The function takes a mandatory argument, the path to the template which should be included, as well as any number of additional arguments which will be passed to the included template.
{{ include "includes/profile-picture-element.html" $pictureURI $pictureAltText }}
include_text
The ìnclude_text` function can be used to insert another text template at its position during rendering. The function takes a mandatory argument, the path to the template which should be included, as well as any number of additional arguments which will be passed to the included template.
{{ include_text "includes/description.txt" $description }}
Utilities
now
now returns the current date and time in the requested format. The function takes a format string as an argument.
{{ now.Format "2006-01-02" }}
{{ now.UTC.Year }}
This function is derived from the Go time.Now function. For more on how to format dates, see the official Go documentation.
env
env allows you to access environment variables from within your templates. env takes the name of the environment variable as an argument and returns its value as a string.
{{ env "PATH" }}
config
Snowman exposes your site's configuration through the function config. The following example illustrates how to retrieve your SPARQL endpoint:
{{ config.Client.Endpoint }}
safe_html
The safe_html function allows you to render an HTML string as-is, without the default escaping performed in HTML/unsafe templates.
{{ safe_html "<p>This renders as HTML</p>" }}
Note that you should only use with content you trust and control, as it can expose your site to cross-site scripting attacks.
read_file
The read_file function reads the contents of a file and returns it as a string.
{{ read_file "relative/path/to/file.txt" }}
Note that the path must be relative to the root of the project and that Snowman do not have access to files outside of the project directory.
current_view
The current_view function return the configuration of the view being rendered.
{{ current_view }}
Note that thecurret_viewfunction isn't available when used inside of templates included using theincludeorinclude_texfunctions. You can however pass the value ofcurrent_view` as an argument to the included template:
{{ include "includes/child-template-aware-of-the-view.html" $current_view }}
version
The version function returns the Snowman version used to build the page.
{{ version }}
len
len returns the integer length of its argument.
js
js returns the escaped JavaScript equivalent of its arguments.
index
index returns the item at the given position from a slice, array or map.
index $my_map 0
Configuration
This page is a stub. You can help by expanding it.
snowman.yaml
snowman.yaml contains the core configuartion needed to build your project such as the SPARQL endpoint you are targeting and project specific metadata.
A typical snowman.yaml looks like this, however only the SPARQL client and its endpoint is mandatory:
sparql_client:
  endpoint: "https://query.wikidata.org/sparql"
  http_headers:
    User-Agent: "example Snowman (https://github.com/glaciers-in-archives/snowman)"
metadata:
  production_setting: "a config value"
Note that while Snowman will look for snowman.yaml by default you can point to other files when building your project:
snowman build --config=production-snowman.yaml
This is useful if you need to build your proejct in various environments such as development, CI, and production.
Version Requirements
You can specify a required Snowman version in your snowman.yaml to ensure all team members are using a compatible version:
snowman_version: ">=0.7.0"
sparql_client:
  endpoint: "https://query.wikidata.org/sparql"
The snowman_version field uses NPM-style semantic versioning syntax and supports various constraint formats:
- Range constraint:
">=0.7.0"- Requires version 0.7.0 or higher - Caret constraint:
"^0.7.0"- Compatible with 0.7.x (allows patch and minor updates) - Tilde constraint:
"~0.7.0"- Compatible with 0.7.x (allows patch updates only) - Exact version:
"0.7.1"- Requires exactly version 0.7.1 - Complex range:
">=0.7.0 <0.8.0"- Between 0.7.0 (inclusive) and 0.8.0 (exclusive)
If the Snowman version doesn't satisfy the requirement, the build will fail with a clear error message:
Error: Version mismatch. Your Snowman version (0.6.5) does not satisfy the project requirement (>=0.7.0)
This field is optional. If omitted, any Snowman version can attempt to build the project.
Metadata
The metadata field allows you to define project-specific configuration values that can be accessed in your templates. This is useful for storing site-wide settings like site titles, URLs, author information, or any other data you want to reuse across your templates.
metadata:
  site_title: "My Awesome Knowledge Base"
  base_url: "https://example.org"
  author: "Tux"
  contact_email: "[email protected]"
  analytics_id: "123456-1"
  social_links:
    - name: "Codeberg"
      url: "https://codeberg.org/..."
    - name: "Mastodon"
      url: "https://social.example.org/tux"
Accessing metadata in templates
Metadata values can be accessed in your templates using the config template function:
<title>{{ config.Metadata.site_title }}</title>
<meta name="author" content="{{ config.Metadata.author }}">
<a href="mailto:{{ config.Metadata.contact_email }}">Contact</a>
For nested values like the social links example above, you can iterate over them:
<ul>
{{ range config.Metadata.social_links }}
  <li><a href="{{ .url }}">{{ .name }}</a></li>
{{ end }}
</ul>
views.yaml
views.yaml connects you queries with your templates and assignes an output path to each pair. You can think of it as Snowman's router or controller.
Snowman have two different types of views. One which outputs a single file and forwards all of the query results to the template.
views:
  - output: "index.html"
    query: "index.rq"
    template: "index.html"
The second outputs one file per SPARQL result(row) and takes one of the returned SPARQL-variables as a path argument. The following would therefore need a query which returns a ?id variable for each row. Only the row is forwarded to the template.
views:
  - output: "entities/{{id}}.html"
    query: "entities.rq"
    template: "entity.html"
Non-HTML templates
By default Snowman uses HTML-aware templates which escapes <, >, etc as well as CSS and JavaScript. To disable this behaviour for a given view you can set the unsafe option.
You should never use this for HTML templates, instead you should use the safe_html template function to manage unsafe injections on a case-to-case basics.
views:
  - output: "sitemap.xml"
    query: "entities.rq"
    template: "sitemap.xml"
    unsafe: true
Style guide
This page is a stub. You can help by expanding it.
CLI autocompletion
The completion command can generate autocompletion scripts for the most common shells. It's recommended that you don't use these scripts directly as you would need to update them each time you update Snowman. Instead you should make your shell call this function.
To examplify, in the Fish shell you would use the following for autocompletion:
snowman completion fish | source
Working with multiple environments
If you need different snowman.yaml configurations for different environments you can use the config build flag to build your project using configurations other than the default snowman.yaml.
snowman build --config=production-snowman.yaml
You can also read environment variables using the built-in template function env.
Managing cache
This page is a stub. You can help by expanding it.
Timing builds
Sometimes when you work on large sites, it can be useful to time your build processes to measure the impact of changes. All Snowman commands, therefore, have a flag named timeit. This prints a command's execution time to the console. While this is mostly useful for measuring build times, all Snowman commands support it.
snowman build --timeit
Multilangual RDF labels
When a RDF literal has a associated language you can access it by prefixing your template variable with .Lang.
<span lang="{{ .name.Lang }}">{{ .name }}</span>
Rendering JSON
This page is a stub. You can help by expanding it.
Rendering XML
This page is a stub. You can help by expanding it.
Fetching files
This page is a stub. You can help by expanding it.
Reading local files
This page is a stub. You can help by expanding it.
Retrieving and parsing JSON
This page is a stub. You can help by expanding it.
Site metadata
This page is a stub. You can help by expanding it.
Reading environment variables
This page is a stub. You can help by expanding it.
Parameterized queries
This page is a stub. You can help by expanding it.
Building with Github Actions
This page is a stub. You can help by expanding it.
Building with Gitlab CI
This page is a stub. You can help by expanding it.